Using the Arrow Tool
You can use the new Arrow annotation as a pointer to call attention to a certain feature or to indicate a particular area of interest on 2D views.
You should note that by default, captions are not added to arrow pointers. However, you can add text manually after you create the annotation.
The properties available on the Data Properties and Settings for modifying the appearance of an Arrow annotation include its thickness and the style of its control points, as well as the text that will appear with the annotation.
 How to Add an Arrow
- Select the required 2D view.
- Click the Arrow
 tool in the Annotate panel.
- Click at the starting point of the arrow, drag, and then release the mouse to create the end point.
- Adjust the properties of the selected arrow, as required.
How to Resize an Arrow
If required, you can resize arrows by simply dragging either the start or end control points that define the annotation. See for more information about control points and how to modify annotations.
- Select the required arrow, either directly in the 2D view or in the top section of the Data Properties and Settings panel.
The arrow's control points appear.
- Click inside either the start or end control point and then drag.
- Click inside the selected control point to de-select it.
How to Move an Arrow
- Select the required arrow, either directly in the 2D view or in the top section of the Data Properties and Settings panel.
- Select the line connecting the two end points and then drag to reposition the arrow.
Arrow Properties
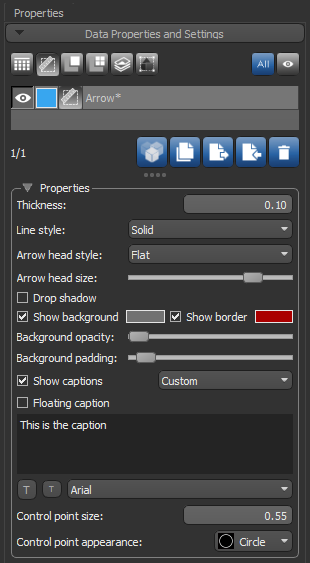
You can customize the appearance of arrows and their captions in the Properties box, shown below.
Arrow properties
| Description | |
|---|---|
| Thickness | Indicates the thickness (in screen percentage) of the contour that defines the shape of the annotation, including its control points.
|
| Line style | Lets you choose a line style for the annotation — Solid or Dashed. |
| Arrow head style | Lets you choose an arrow head style for the annotation — None , Flat, or Barbed. |
| Arrow head size | Lets you adjust the size of the arrow head. |
| Drop shadow | If selected, a drop shadow will appear below the annotation. |
| Show background | If selected, a background will be added to the annotation and its caption. Additional settings for background include:
Background color box… Lets you select a background color. Background opacity slider… Lets you set the opacity of the background. Background padding slider… Lets you increase or decrease the size of the background. |
| Show border | If selected, a border will appear around the annotation and its caption.
Border color box… Lets you select a border color. |
| Show captions | If selected, a caption will appear with the annotation. Options include:
Custom… If selected, the caption entered in the Caption edit box will be shown. |
| Floating caption | If selected, the caption will appear in a floating box that can be repositioned manually anywhere within the view to avoid overlapping. |
| Font size and style | Lets you increase or decrease the font size of the caption with the Increase font size and Decease font size buttons, as well as choose a font style. |
| Control point size | Lets you set the size (in screen percentage) of the annotation's control points.
|
| Control point appearance | Let you choose a shape — circle, square, triangle, cross, or "X" — for the annotation's control points. |
Configured Actions for Arrows
A number of configured actions and keyboard shortcuts are available for creating and editing arrows. The default settings for these actions are listed in the following table.
| Action | Key | Mouse |
|---|---|---|
| Create an arrow in Arrow mode | Left mouse | |
| Edit an arrow in Arrow mode | Left mouse | |
| Switch to Arrow mode |